Looking to build an inexpensive and effective mash tun? Look no further, and read on!
Please note: All specific parts listed here are fitted for a 10-gallon Igloo beverage cooler. If you have a Rubbermaid or other brand of cooler you may need to adjust the size of the fittings to cooler but the same principles apply.
One of the most important pieces equipment in a brewery is the mash tun, the large vat which extracts the fermentable sugars and tasty deliciousness from crushed grains. In the case of homebrewing, we perform essentially the same step when we steep specialty grains, perform a partial mash, or when we move to an all-grain setup. This requires that we hold our mash at a constant temperature for a period of time – usually 60 minutes if we are dealing with grains that produce fermentable sugars. This can be a tricky task when dealing with larger volumes of water. Sure, kitchen elements and propane burners provide heat but these heat sources can be difficult to dial in to yield that desired constant temperature over an extended timeframe. And really, who really wants to sit and babysit a pot and thermometer for an hour longer than they need to?
Instead of applying constant heat, many homebrewers have turned to a solution to keep the heat inside rather than pull it from the outside. Enter the insulated beverage cooler. Available in varying sizes, these can be converted into an ideal mash tun with a little DIY handiwork. Last week I converted a cooler with great results – I was able to mash my grains and only lose exactly 1 degree Fahrenheit over the course of the hour, well within the accepted range.
To make a mash tun:
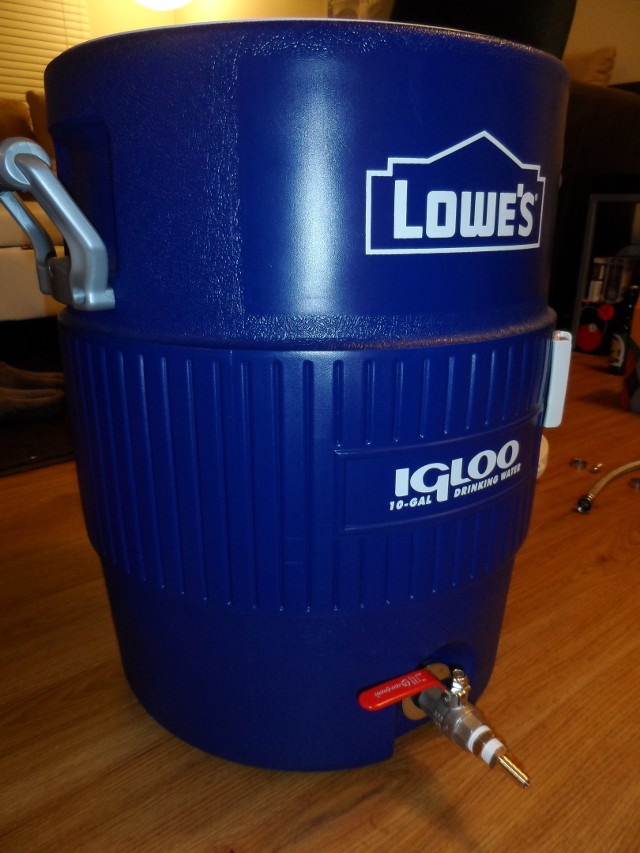
1. Obtain a beverage cooler of appropriate size. I decided on a 10-gallon round Igloo beverage cooler that I purchased at Lowe’s for $49.99 in Grand Forks, ND. If you’re Canadian like me you’ll find that these are significantly less expensive South of the border. You can definitely use the smaller versions too for partial mashes, but I am slowly upgrading toward all-grain batches so the ability to hold 5 gallons of water plus grains dictated that 10 gallons was the right size. You can also find other brands like Rubbermaid of similar quality for similar prices.
2. Hit up your local hardware store(s) for some fittings:
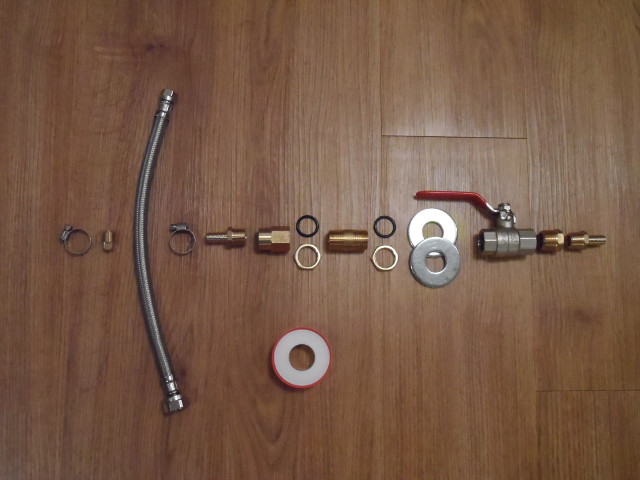
Parts list, from left to right (leftmost parts are installed inside the cooler, moving toward the outside):
- (a) 2 – 3/8″ stainless steel hose clamps
- (b) 1 – brass square head plug (Watts A737)
- (c) 1 – stainless steel braided faucet connection hose
- (d) 2 – 3/8″ barb x 3/8″ MIP hose barb adapters (Watts A294)
- (e) 1 – 1/2″ FIP x 3/8″ FIP pipe reducing coupling (Watts A815)
- (f) 2 – 1/2″ faucet lock nuts (Moen M3875)
- (g) 2 – 11/16″ inner diameter O-rings (Moen M3959)
- (h) 1 – 1/2″ MIP brass pipe nipple (Watts A836)
- (i) 1 – thick as possible O-ring with at least 1/2″ inner diameter (not pictured)
- (j) 2 – 1/2″ galvanized washers
- (j) 1 – 1/2″ x 1/2″ brass ball valve
- (l) 1 – 1/2″ MIP x 3/8″ FIP brass pipe hex bushing (Watts A828)
- 1 roll teflon tape
3. Remove the existing spigot from your cooler. This is easily done by unscrewing the interior plastic nut.
4. Wrap any visible threads with teflon tape to create a water-tight seal.
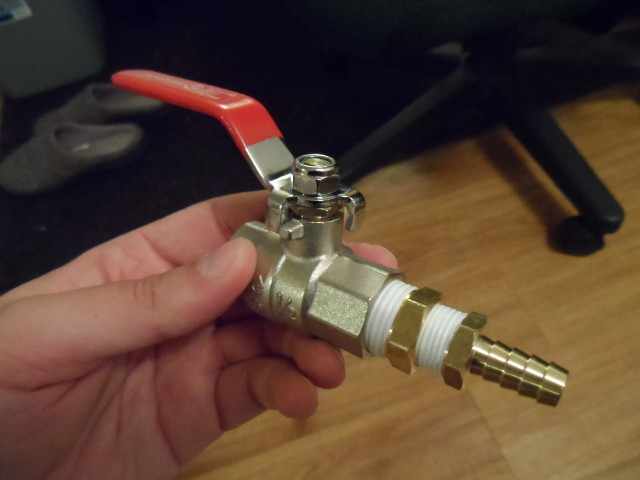
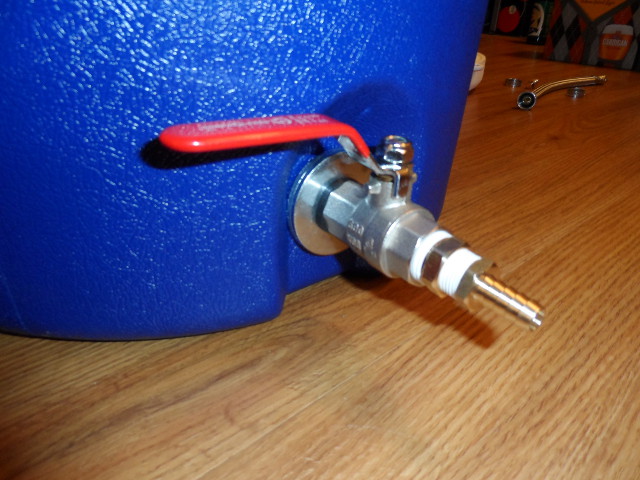
5. Assemble the ball valve. Insert one of the hose barb adapters (d) into the pipe hex bushing (l). Insert the male end of the pipe hex bushing into the ball valve (j) as shown. (Yes, I now realize the ball valve is backwards in the picture…)
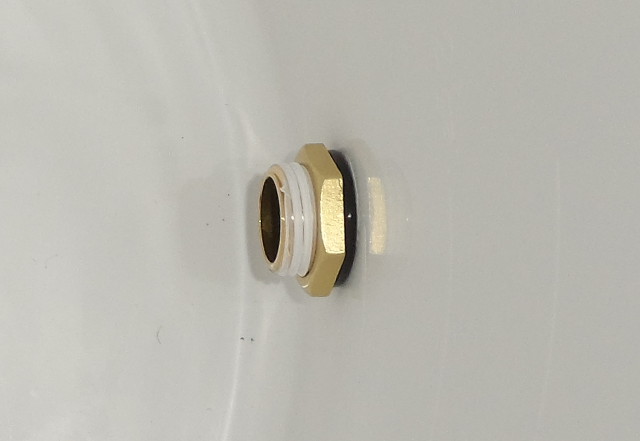
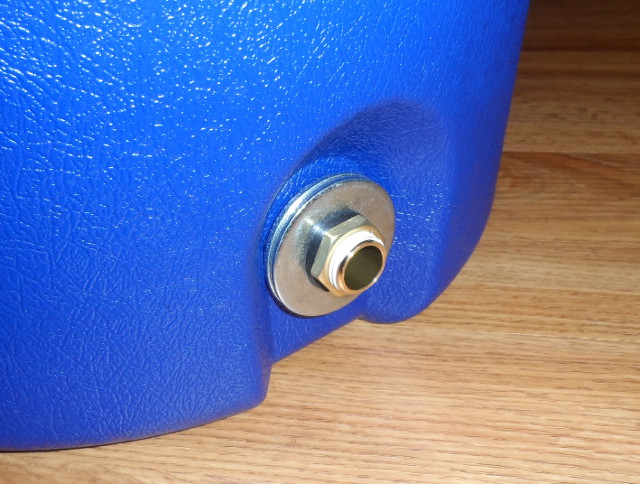
6. Insert the brass nipple (h) into the spigot hole. Inside the cooler, stretch one of the O-rings (g) over the nipple and follow with a lock nut (f) to create a seal on the inside.
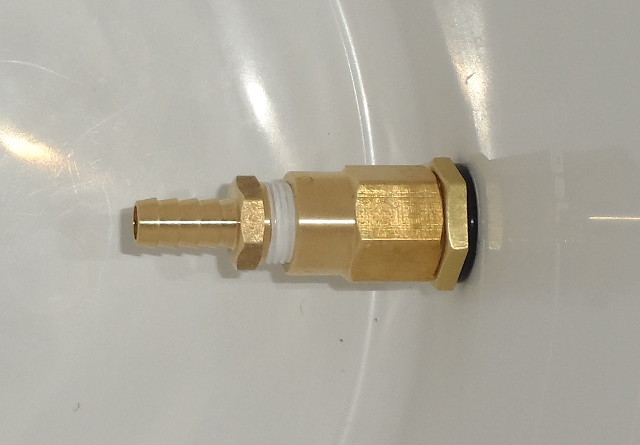
7. Attach the coupling (e) to the remaining thread, then screw the other barb adapter (d) into the coupling.
8. On the outside of the cooler, stretch the larger O-ring (i) over the nipple and push against the cooler wall. Add two washers (j), then add the last small O-ring (g) and optionally the second locking nut (f) if you enough thread bare. This should now be nice and tight when all screwed together.
9. Attach ball valve assembly from step 5 to the nipple.
10. At this point, stop and fill with water to make sure your fittings are watertight. If you detect any leaks, check your connections, particularly where the o-rings press against the cooler. If it is indeed watertight, congrats! You’re almost done.
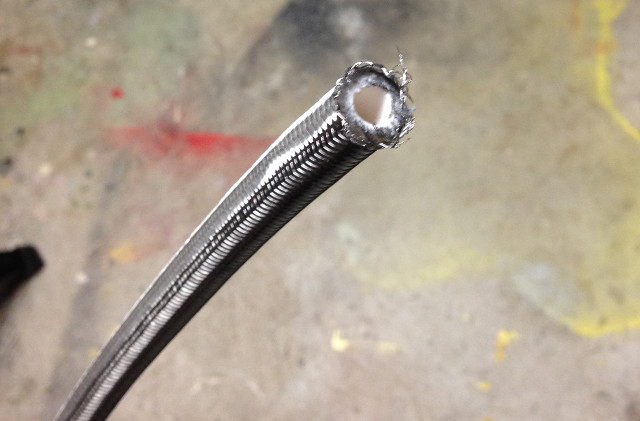
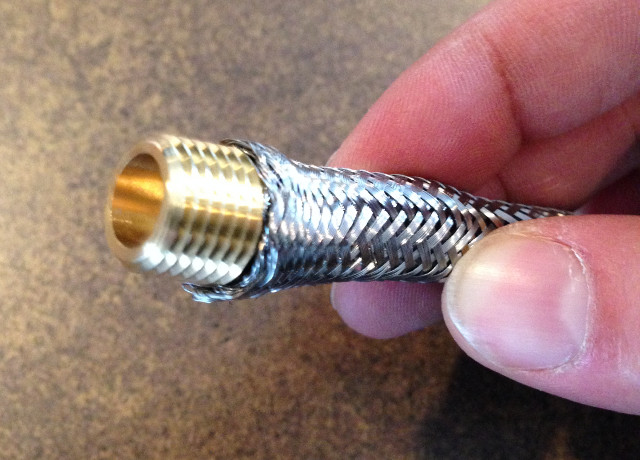
11. Now you need a way to strain your wort. To build the filter, cut both ends off the braided faucet line (c) with a hacksaw or a dremel.
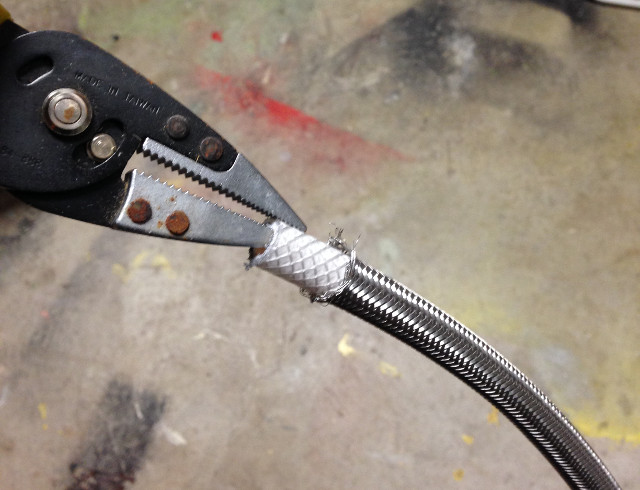
12. You’ll have to remove the tube lining the stainless braid. To do this, carefully push the braid off the tubing with needlenose pliers to expose it. Grip the tubing and pull slowly and firmly while pulling on the braided casing in the opposite direction. Be extra careful to pull in the opposite direction of the braiding – you don’t want that to unravel accidentally.
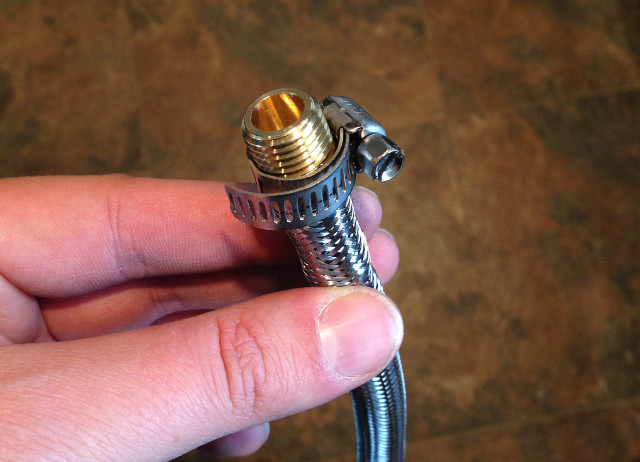
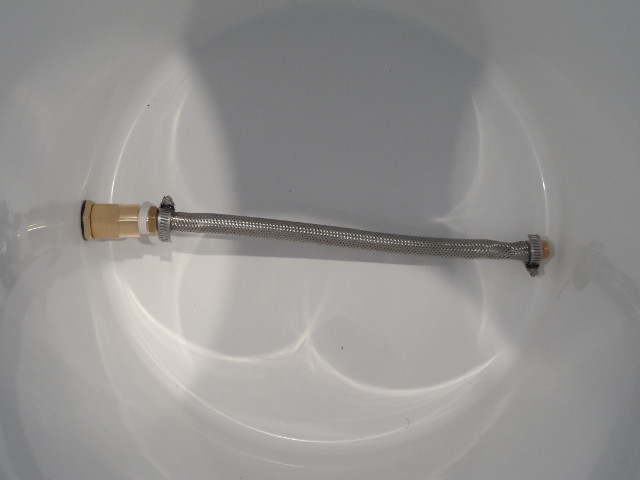
13. Once the tubing is removed, you’ll have a flimsy feeling stainless steel braided hose. This forms the filter for your wort, since the grain particles are too large to get through the gaps in the braid, but liquid can easily flow through it. The edges of your braid will be frayed on both sides, so use pliers to bend those inward to guard against nasty cuts and scratches to your cooler. Insert the square head plug (b) into one end of the braid.
14. Tighten one of the hose clamps (a) around the end of the filter to make sure it doesn’t separate from the head plug.
15. Slide the other end of the filter on to the hose barb inside the cooler and fasten with another hose clamp (a).
16. Huzzah! It looks like the inside of your cooler is done now too. Fill with water and test it out to make sure it’s not leaking again.
17. There’s nothing left to do but put it to use. Sterilize the inside and spigot, rinse it out, and get mashing!
So there you have it! You can now go off and build your very own mash tun to expand your setup or make life easier on yourself – and you can do it for under $100. Like I mentioned earlier, I experienced great results on my first mash with this setup.
I should also mention that this also gives you the option of adding a false bottom if you choose to go that route. I plan to in the near future, but the stainless braid was a nice cheap alternative that got me mashing before I decide exactly how the false bottom should work. Of course, I will be updating this blog with any upgrades I do to my setup so stay tuned!
If you do have any questions about any of this or ideas on how to improve on this, please don’t hesitate to leave a comment or find me on twitter at @impossibrewbeer

Hi there everyone, it’s my first pay a quick visit
at this web site, and article is actually fruitful for
me, keep up posting these articles.
These were very helpful, I followed them mostly deviating in a few areas to fit my needs. Just an update, I happen to live very close to the specific Lowe’s you mention. They no longer carry any lock nut the would work in this particular design. I had to look elsewhere for that piece. These directions got me about 95% of the way there though, thanks.
Best Mash Tun build instructions I have seen so far. Will the Igloo 10-Gallon Plastic Beverage Cooler Item #: 58378 | Model #: 00042172 for $15.99 in the US Lowes? I´m assuming it will, but just wanted to ask if anybody has tried it. Not sure why the huge price difference.
Question: could you have used a 3/8 inch brass pipe nipple instead of 1/2 inch and thus not need the adapters? Or was the hole in the cooler from the existing spigot to large for a 3/8 inch pipe nipple?
I’d say stick with 1/2″. The hole on the Lowe’s Igloo brand I got was rather big. At first, I did have some leakage but after adjusting the washers and rings it’s pretty solid now. But yea, stick with larger.
For false bottom, put a 9″ colandar in the bottom (w/o handles)
I just got this same igloo from lowes, are the fitting sizes the 1/2 size, like being sold at
Bargainfittings? I want to use all stainless steel parts, can’t find them local and no response asking bargainfittings…
could you please elaborate more on the type of ball valve to buy. there are so many types with different threads. and please elaborate on the o-ring size dimensions. many o-rings have the 11/16 dimension you listed, but two other dimensions as well, e.g. 11/16 x 9/16 x 1/16 VS. 11/16 x 7/16 x 1/8
I had a lot of trouble finding the Moen brass faucet lock nuts. I ended up using only the nut part of the Danco Faucet Rosette and Nut (Model # 88652) and it seems to be holding up well.
I could not find the Moen locknuts either. So ended up using Danco’s Locknuts (Model # 88009). Leak free during water test, but haven’t brewed yet.
What do MIP and FIP mean in these circumstances?
Male and female threaded, respectively.
T_T can’t believe i couldn’t make heads or tails of that on my own… Thanks for the post! I’m using this as a guide to build my first tun next weekend.
No problem, that’s what I’m here for. Good luck with your build!
I use these instructions to make a mash tun, and a hot liquor tank. We tested it out this weekend and it worked flawlessly. Thanks!
Excellent! I’m glad it worked for you as well as it did for me.
Pingback: Glugzel’s Glugs has stuff too | Nighthawks at the Dive Bar
Pingback: nickbrews
Came across this post by accident and I’ve bookmarked it for later. Brilliantly explained and the photos are great.
Eli
Thanks for the great commens, Eli!
I figured there was someone out there who could use this info. I’ve found lots of conversion instructions for Rubbermaid coolers, but none that list part numbers specifically for Igloo brand. I’ll continue to add more homebrew stuff over the course of time too.
Thanks for reading!
Can’t wait to taste some of the brew coming out of this setup!!
The first batch is a coffee beer! But who knows what’s next. I am thinking along the theme of Christmas…